
Maven Branding
Guidelines to design your site.
Typography
Heading 1
Use sparingly to call attention to special areas.
- Snell Roundhand
- Bold Italic
- 95px desktop, 46px mobile
- Character spacing: 0
- Line spacing: 1.3
Header 3
Use for each page's main headline
- Lulo Clean
- Italic
- 20px desktop, 18px mobile
- Character spacing: 0
- Line spacing: 1.3
Paragraph text 2
Use for large blocks of text
- Future Light
- 22px for intro paragraphs, 16 for all else
- Character spacing: 0
- Line spacing: 1.3
Header 2
Use for each page's main headline
- Bodoni italics
- Italic
- 60px desktop, 28px mobile
- Character spacing: 0
- Line spacing: 1.3
Paragraph text 1
Use for large blocks of text
- Future Light
- 22px for intro paragraphs, 16 for all else
- Character spacing: 0
- Line spacing: 1.3
Button Text
Futura 16px
Futura light is too hard to read
Try to keep any buttons to no more than 5 words
Color
#C2AB8A
#F7F0D9
Colored background + Text color combo
#E6E6E6
#000000
Colored background + Text color combo
#C2AB8A
#FFF6E8
Colored background + Text color combo
Adding a new professional

Navigate to the Content Manager on the left--hand menu. The list is called "Beauty & Wellness Professionals".

Once you've opened up the data, there's two places you can add new item - top right and bottom left. When adding Services, be sure to use the list provided (instead of typing it out) to ensure no spelling errors that would cause the service to not show up when clicked in the 'Search by service' drop-down.

Once you've made your edits, sync to the live site. This will automatically at them to the 'repeaters' on the Find a Professional/Services page, as well as generating a new 'item' page for that person.

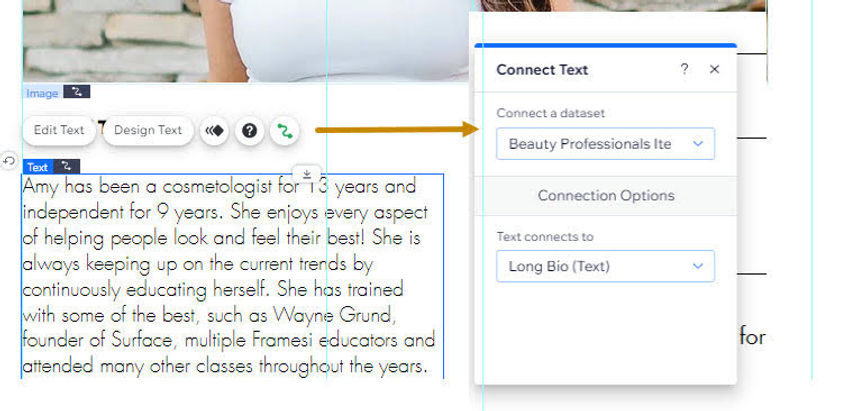
All the sections in the 'Beauty Prof Item Page' are connected to data in the list. If you ever need to edit what is connected, click and sqiuggly line as shown in this image, and use the drop-downs to find the dataset and which column in the dataset to connect to.
1. If you click on the services drop-down, you'll see that it's synced with the content manager and tags will automatically be added.
2. Go to the content manager. Double click into the Services section you want to edit. Just start typing the new tag you need and hit 'enter' to add it. Everything will sync from there.
3. You do need to make sure to sync for 'live'.
4. Double check the drop-down to see that it's there, you may need to hit 'publish'.


